Removing your dashboard is a lengthy process that requires devout organization and attention to detail. It can make it a lot easier to replace several parts of your RSX:
- Heater Core Assembly
- Heater Core
- Evaporator Core
- AC Thermal Expansion Valve
- Tweeter Drivers (Type-S Only)
- SRS Computer
- Blower Assembly
I went through this arduous journey to remove my heater core assembly, and decided I'd do my best to document everything and explain the process.
Note: If you purchase your supplies from my Amazon links, it will support this website at no extra cost to you. : ) Thank you.
Required Tools:
I highly recommend you have the plastic bags and permanent marker to organize your bolts. The permanent marker can also help by creating lines on the electrical connectors to remember where they go and match them up more easily.
Before you start working on this job, make sure your car's wheels are centered and pointed directly forward. This will make it easier to align your steering wheel on reinstallation. If you didn't do this, it's still possible to align the steering wheel afterwards though.
The next important part here is to remove the negative battery terminal, since we'll be removing SRS (air bag) components that could explode if removed while connected to power.. The battery needs to be disconnected for at least 3 minutes before you start working on anything involving the air bags.
In the meantime, start removing the glove box. Empty it out and remove the clips at the top with the dampers on them, then remove the 10mm bolts with a socket. They can be removed with a Phillips head screwdriver or a 10mm socket.
 |
| Clips |
 |
| Bolts / Screws |
 |
Glove Box
|
Remove the passenger dashboard lower cover by disconnecting the clips. Pay attention to the way the clips are disconnected in the diagram. Push in the center with a small screwdriver, and then pull the clips out. The rear of this panel has a notch it goes into, so be gentle while navigating it out.
 |
| Passenger Dashboard Lower Cover |
Remove the heater control panel next by gently negotiating it out using the plastic pry tools. Disconnect the electrical connectors once the panel is off.
 |
| Heater Control Panel |
 |
Climate Control Panel, Removed
|
Take out the driver's switch panel with the plastic pry tools. After removal, disconnect the electrical connectors from the rear of the panel.
 |
| Driver's Switch Panel |
 |
Driver's Switch Panel
|
 |
Driver's Switch Panel Connectors
|
Remove the driver's dashboard lower cover by turning the two lock knobs 90 degrees.
 |
| Driver's Dashboard Lower Cover |
Next, remove the cigarette lighter panel of the center console. You might be able to pull it out by hand, but I used a plastic pry tool. Be careful not to break it, it has plastic clips built into it. Once it's out, disconnect the cigarette lighter's electrical connector.
 |
| Dashboard Center Lower Cover / Cigarette Lighter Panel |
We'll proceed to remove the console now. The first step in this subassembly is removing the trim around the gear shift lever if you have an automatic transmission, or alternatively unscrewing the shift knob if you have a manual transmission. For the automatic transmission, you can use the plastic pry tools to lift up the trim ring around the gear shift lever. For the manual transmission, you'll pull down the collar and unscrew the knob.
 |
| Automatic Transmission Trim Ring |
 |
| Manual Transmission Shift Knob |
The next step is removing the console trim. It has some plastic clips that hold it in, so you'll use the plastic pry tool to get it started and then pull it out.
 |
| Console Trim |
There's a few fasterners to remove before the console should just come up and out towards the rear of the car. Don't forget to remove the electrical connector for the rear cigarette lighter.
 |
| Console Screws and Clips |
 |
| Final Console Screws |
Remove the radio now. There are 2 10mm bolts that can be accessed from where the panel below it was removed. Afterwards, you can stick your hands in behind the radio and apply some pressure to push the radio out. Admittedly, I have an aftermarket double-DIN radio panel that's easy to push out, but you may have to use the plastic pry tools to remove your stock radio panel.
 |
| Center Panel / Radio Panel |
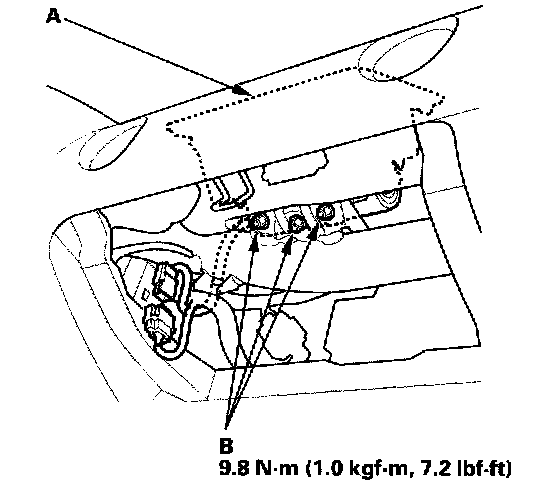
Removing the passenger airbag is next. Make sure the battery has been disconnected for at least 3 minutes before proceeding. There's a yellow electrical connector to disconnect that is different from most other connectors on the car. To disconnect it, look in where the radio was, and you can see the clip on the back of the yellow connector. Squeeze the rear with needle nose pliers, and gently push it out the other side. Once the connector is free, push the spring-loaded outer connector sheath back all the way and it will disconnect. You'll have to cut one of the plastic zipties around the cables connected to it to be able to pull it out. Then, there's 3 10mm nuts on studs to remove on the back of the air bag unit. You can press upward from the rear of the airbag module to remove it. It may take some jiggling to get it free. Be careful if you try to pry it out from the top, as you can easily damage the rubber airbag cover.
Once the airbag is off, store the airbag face-up somewhere it won't be bothered. I put it in my trunk.
 |
| Passenger Airbag |
 |
Yellow Air Bag Connector (Left)
|
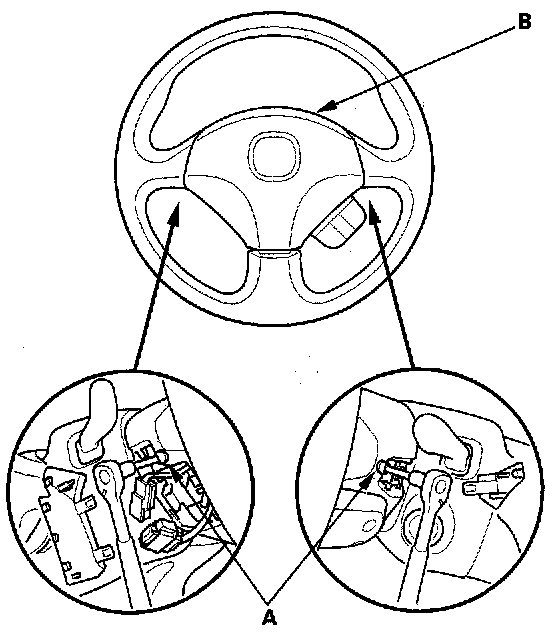
The driver's side airbag is next. Just in case... make sure the battery has been disconnected for at least 3 minutes before proceeding. Take off the access panels on the steering wheel. Remove the access panel, and disconnect the yellow airbag connector the same way you did the passenger side connector. There are 2 T-30 Torx bit screws holding in the airbag. Take those out and the airbag module will come free. Similar to the passenger airbag, store it upright somewhere safe.
 |
| Access Panel (A), and Electrical Connector (B) |
 |
| T-30 Torx Bit Fasteners |
Proceeding with steering wheel removal, you need to disconnect the electrical connector for cruise control, and remove the steering wheel bolt. The bolt requires a 14mm socket to remove. I used an impact wrench, but you can have someone hold the wheel still and take it off with a longer ratchet or breaker bar. After it's off, thread it back on a few turns, so when you pull off the steering wheel it doesn't go flying.
 |
| Cruise Control Connector (A), Steering Wheel Bolt (B) |
Before further removal, take a permanent marker or paint pen and draw a line connecting the steering column shaft to the steering wheel directly at 12 o'clock. This will help you mount the steering wheel on straight.
To remove the steering wheel, you may need to use a steering wheel puller. I just jiggled mine vigorously until it came free. Be careful because there's a delicate ribbon cable attached to the area behind the steering wheel. Make sure all the connectors are disconnected so you can remove the steering wheel.
Next, we'll be removing the steering column.Take off the 4 Phillips head screws holding the steering column cover from the back of the steering wheel mount.
Afterwards, remove the assembly that holds on the turn signal stalk and wiper control stalk. There's just one large JIS bit screw at the top. Make sure you either use a JIS bit or similar to avoid stripping the screw out.
Disconnect all the electrical connectors holding the assembly to the steering shaft.
Finally, remove the 12mm steering column joint bolt.
 |
| Steering Column Assembly |
You can use a metal pry bar to pop up the door sill trim, and then you can pull the kick panels toward the center console to pop their plastic clips off. In a similar fashion you can remove the A-pillar panels.
 |
| A-Pillar / Kick Panel Removal |
Now, to remove the steering hanger beam and dashboard. You may begin by using the plastic pry tools to pop off the plastic covers on either side of the dashboard.
 |
| Dashboard Side Covers |
At this point, we have some connector removal to do. The under-dash fuse box needs to have everything unplugged from it. After everything is disconnected, remove the air tube from the in-car temperature sensor. Before you start wildlu unplugging, you may want to use a permanent marker to mark each individual connector and its home. Otherwise, it will make reassembly awfully confusing.
 |
| Fuse Box Connectors / Air Hose (J) / In-Car Temperature Sensor (K) |
 |
Under-Dash Fuse Box Connectors
|
Similarly, unplug everything shown and remove the T30 Torx bolt holding in the ground cable. It's difficult to remove in my experience, as manual RSX's have shift cables that will block you from removing this fastener. The job is made easier by removing the 4 bolts holding the shifter in so you can push it to the side. Also, even when I was able to get in there, the Torx bolt was held in extremely tightly, and I had to cut the head off and drill it out.
 |
| Center Console Connectors |
 |
| Center Console Connectors |
 |
| Passenger's Side Under-Dash Area |
 |
ECU Connectors (A)
|
Let's move to the instrument cluster removal now. There's 2 Phillips screws underneath the cluster where the steering column was blocking that you need to remove. After that, just reach up behind the instrument cluster and push it out. It should come out very easily. There's 2 electrical connectors to remove before the instrument cluster is fully out.
 |
| Instrument Cluster |
 |
Instrument Cluster Connectors
|
Remove the sunlight sensor by sticking your hand into the dashboard and pressing up on it to get under it with the plastic pry tool. Disconnect the electrical connector when it pops out.
 |
| Sunlight Sensor - Located in Middle Front of the Dashboard |
Make sure you remove all the bolts, but they're pretty easy to find. The hard part is ensuring all the electrical connectors are unplugged.
 |
| Dashboard, Caps (A) |
 |
| Bolt Caps (A) and Bolts (B) |
The bolts shown in the above photo are the only ones you need to remove from the dashboard to remove it. The Phillips screws holding the plastic part of it to the metal "Dashboard / Steering Column Hanger" are irrelevant. There is no jerking needed to remove it. You'll probably need 2 people, and to disconnect a lot of plastic pins that attach bunches of cables to the steering column hanger.
The service manual doesn't document it, but you will have to basically disconnect every electrical connection inside the car to fully remove the dashboard. It depends what you're trying to access, but just make sure you take plenty of pictures and mark every connector and its pair to ensure you don't forget where things go.
Disclaimer:
I may receive payment if you purchase products using my Amazon links. Thanks for helping keep the HID's on : )