After realizing the massive amount of RSX base model community members that wanted to make more power, I started reading into build threads. It didn't take long for me to find turbocharged base model RSX's. What I stumbled on shortly after was what drove me to make this guide: base model turbo automatic transmission RSX's. Turns out stock RSX automatic transmissions can hold up to about 330 horsepower; perfect for K20A3's, K20A2's out of a Type-S, or even K24 swaps.
Big thanks to the OG, JByron from ClubRSX for his help on this one!
Note: Read through the whole guide in detail before you start buying things and making plans. It can be a little confusing if you haven't made a wiring harness or harness adapter before. Considering this is the only guide online, I'll err on the side of being way too detailed versus just simple instructions.
I can make you a harness if you feel uncomfortable with doing it yourself. Shoot me an email at rsxtrix@gmail.com if you'd like one made, and I'll give you a quote.
What this will allow you to do is:
- Tune your base model auto transmission RSX
- Swap in a different K20 or K24, keeping the base model auto transmission and tune your RSX
Remember, you won't make power from modifications like an exhaust, intake, or anything else unless you are tuned properly for it.
How It Works
Onto the details. The automatic transmission needs to be controlled by the ECU, but the ECU is different between manual and automatic cars. The automatic ECU cannot be modified with K-Pro. Hondata toyed with the idea many years ago, and decided not to go through with it. Therefore, the dual ECU harness was born. You keep the base model auto ECU to control the automatic transmission and shift properly, and you also use another K-Pro-compatible ECU to tune the engine and control some other aspects of the car.
 |
| Dual ECU Harness In Action |
There used to be 2 manufacturers, but neither of them were interested in making any more harnesses, so they ceased production and there's no knowledge of them on the internet. I reached out to both and requested to buy one, but unfortunately they were similarly not interested. I can't say I blame them since the RSX has gone out of production so long ago. I don't want this to be unattainable if someone who really can't drive manual transmissions wants a faster RSX.
Compatibility
This harness will work on RSX Base Model Automatic Transmission ECU's from 2002-2006. 2005-2006 cars have several modifications required, mentioned later.
K-Pro Compatibility Chart:
 |
Ignore the "Reverse Lock" box in this chart. This only applies to manual transmission cars.
|
If you want the easy answer, the best ECU choice would be the 2002-2004 RSX Base Manual Trans. ECU. These both don't have no reverse lockout, but are able to control the secondary intake runner in the base model intake manifold. If you don't plan on switching intake manifolds for the PRB, RBC, or RBB, stick with these. Otherwise stick to these:
- 02-04 RSX Type-S ECU
- 02-04 RSX Base Manual ECU
- 02-04 Honda Civic Si ECU
- 02-04 Honda CRV ECU
K-Pro Resources:
Note: If you purchase your supplies from my Amazon links, it will support this website at no extra cost to you. : ) Thank you.
Required Parts
Guide
Alright, here's a basic layout of what we're going to be making:
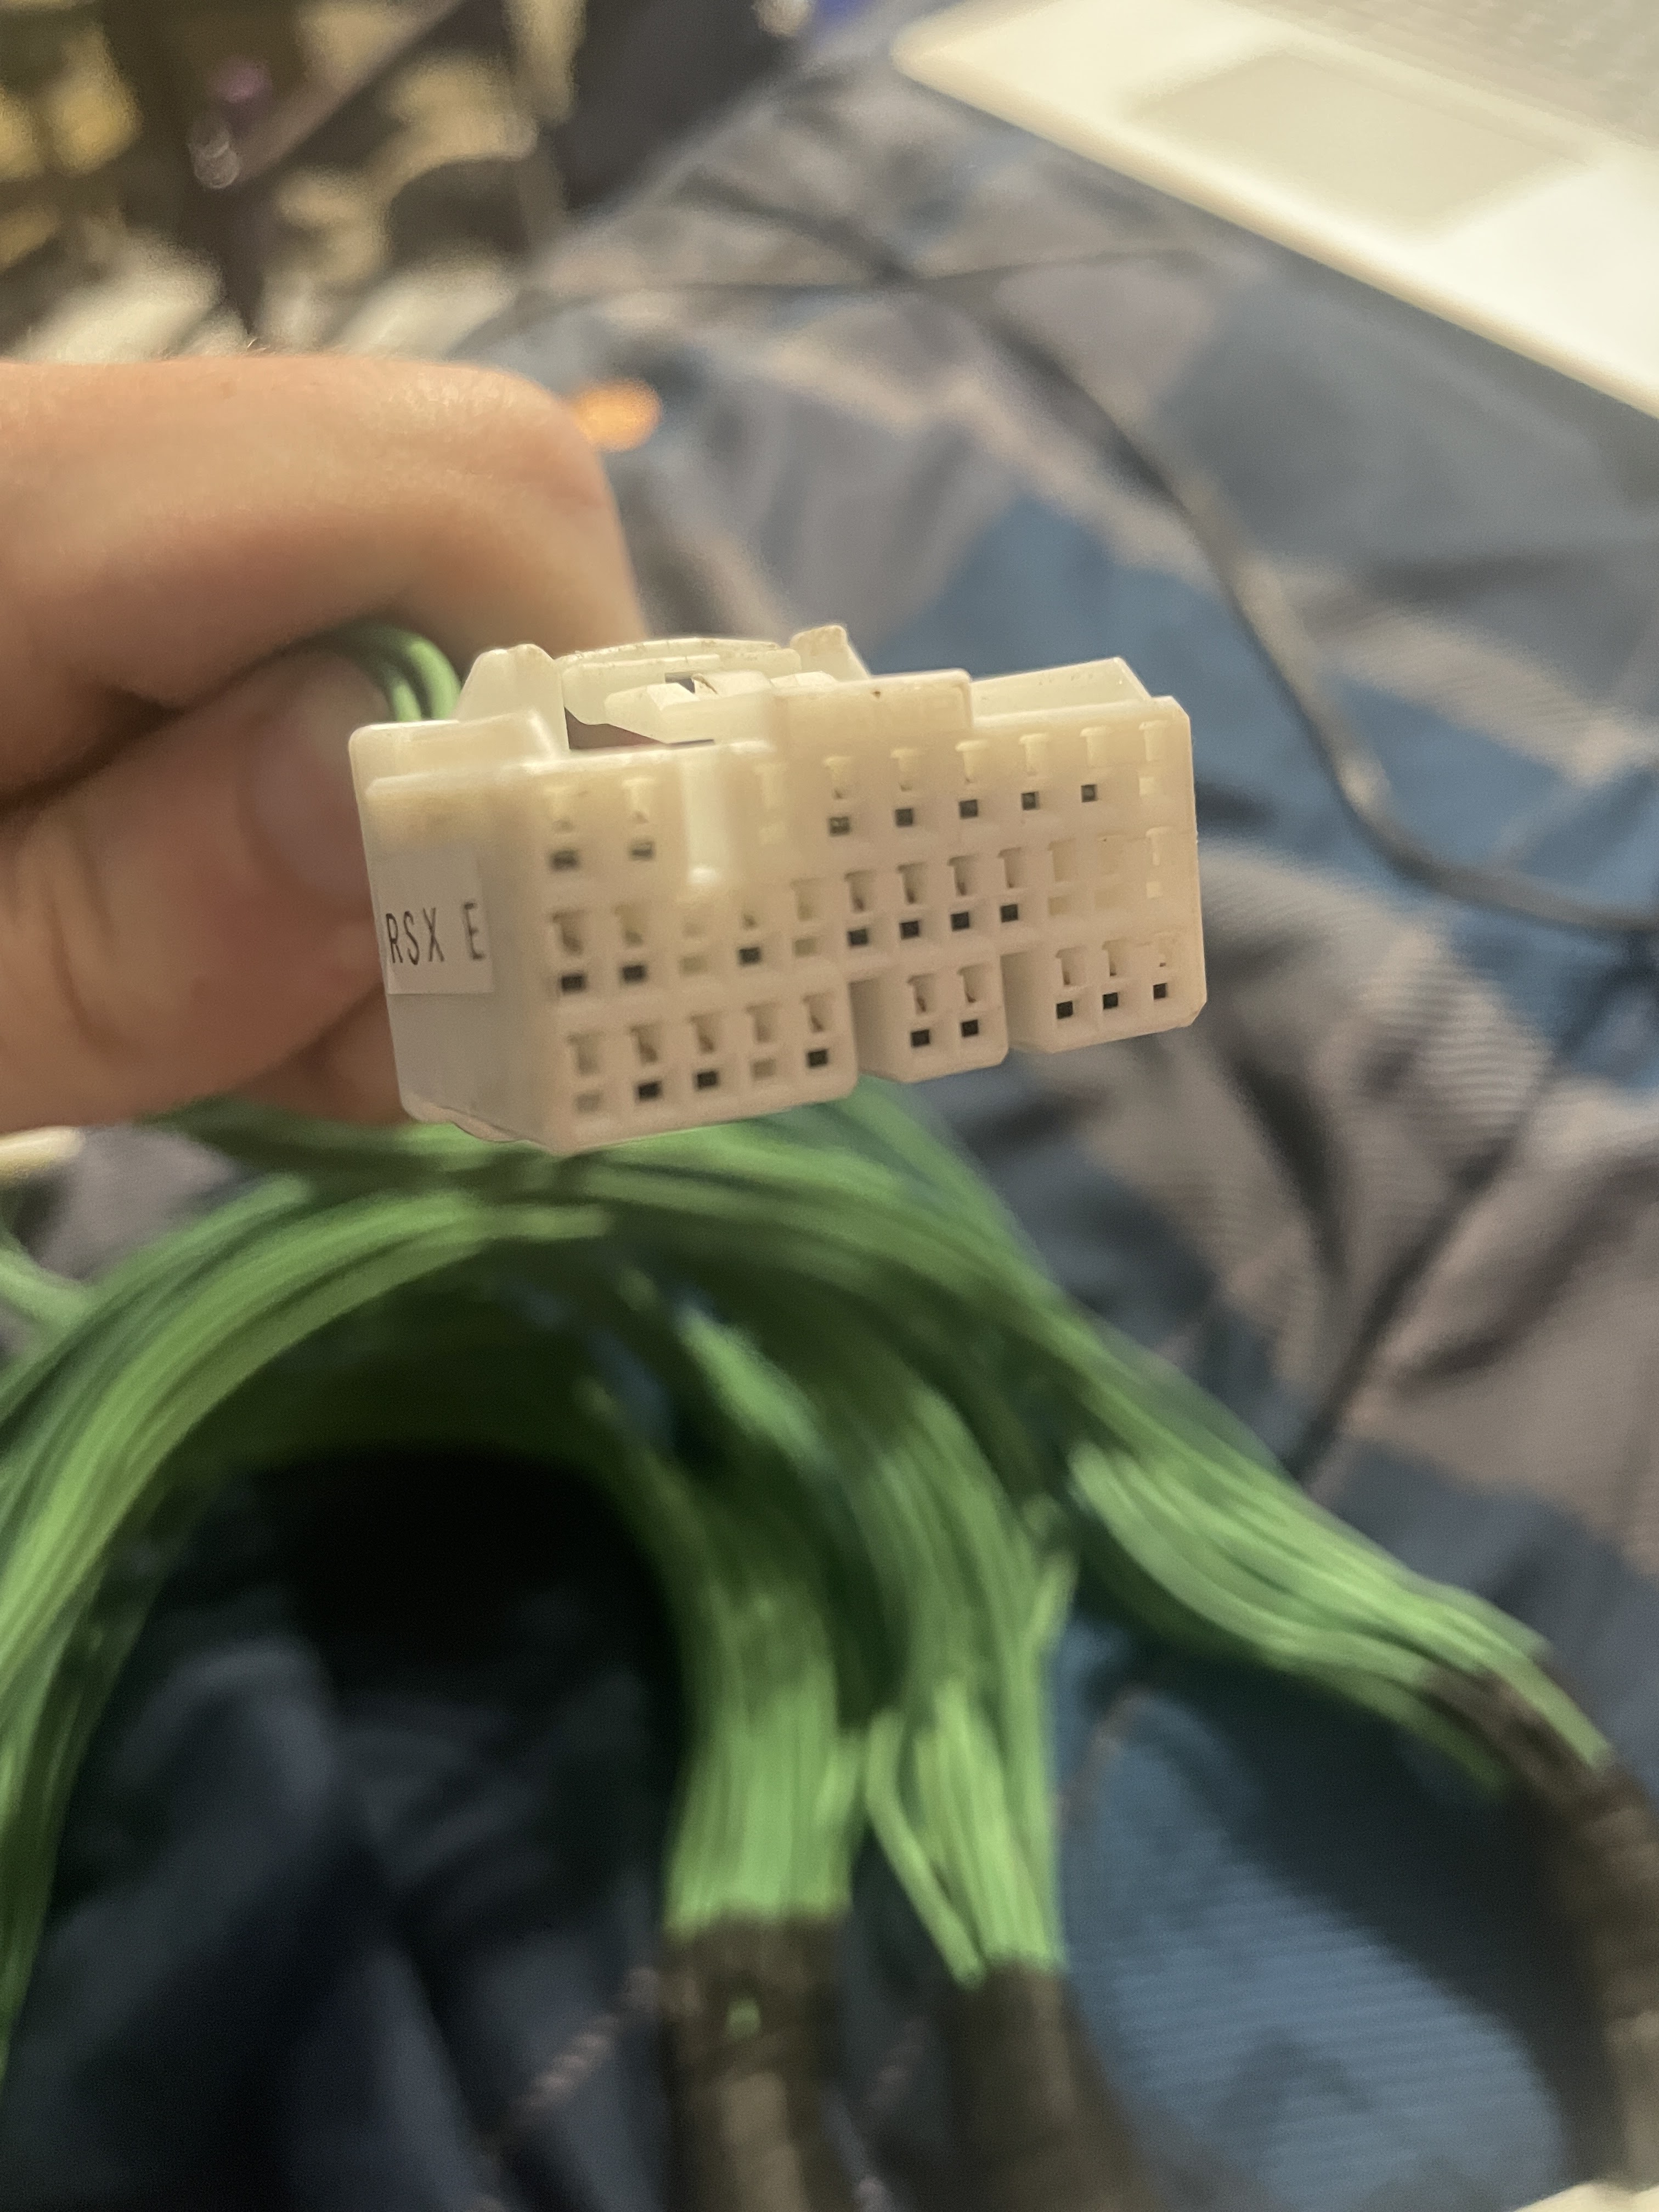
There's 2 female connectors at the end of the wires coming out of the rear of the A, B, and E section of the ECU. As you see in the image above, there's no adaptation for the "C" and "D" sections. Those plugs go directly from the car to the base model ECU.
.PNG) |
| Keep In Mind The ECU Is Mounted Upside Down When Referring To Connector Letters |
I've created these wiring diagrams. The boxes with labels in them have a wire that goes to the main header. The boxes without a label in them don't have a wire going to them. A lot of these have 2 wires going to the same pin, so they have to be spliced together by soldering. 2 specific wires don't go to their respective pins on the main header. I've noted these on the diagrams.
 |
| How Wire Pairs Are Spliced And Heatshrinked |
 |
| Top View Hopefully Giving You More Help In Assembly |
ECU Header Connector
Some manufacturers have discontinued this header. You may have to find another donor ECU with this connector and remove it to make your harness. Each one of the wires is about 14" long to provide some room to mount the second ECU.
 |
| RSX 86-Pin ECU Header Connector |
 |
| ECU Header Connector Side Wiring Guide |
|
I made the diagram above to show the ECU header connector. "K" means there's a wire that goes to the K-Pro ECU from that pin, "B" means there's a wire that goes to the Base Model ECU from that pin. "K, B" means there's a wire going to both connectors from that pin, and requires a splice.
Note: There's no connection on pin B7. This is labeled as "RVS", or "Reverse Lock Solenoid / Valve". The reverse lockout function is only relevant on manual transmissions, so there's no connection made to it.
 |
| ECU Header Connector (Pin Side Of Male Header) |
ECU Connectors
The following pictures are from the "wire side of the female terminals". This means it's numbered from the wire side that goes into the small connectors. The rectangle on the top of the drawing is the clicky part on the connector. This should help you orient it properly so you can start pinning your harness. The connector boxes with labels (Example: IGP2) represent wires you're supposed to connect. The empty ones are unconnected on that specific connector.
 |
A18 Goes To E25 On Main ECU Header
 | Connector Side Of Male Connector A K-Pro
|
|
 |
| Connector Side Of Male Connector A Base Model |
 |
B9 Goes To E18 On Main ECU Header
 | | Connector Side Of Male Connector B K-Pro |
|
Connector Side Of Male Connector B Base Model
 |
| Connector Side Of Male Connector E K-Pro |
 |
| Connector Side Of Male Connector E Base Model |
K-Pro Settings And Troubleshooting
VTEC
 |
| VTEC Settings In K-Pro |
Uncheck the "VTEC Oil Pressure Switch Enabled". This disables the "dumb" oil pressure sender in the back of the engine under the oil filter.
Check "VTC Enabled". Important setting.
If you have an ECU that supports "Secondary Intake Runners Enabled" AND you have a stock K20A3 intake manifold, check the box. If you have a PRB, RBB, or RBC intake manifold, uncheck the box, or ignore it if your ECU doesn't support this setting.
Idle
 |
| Idle Settings In K-Pro |
Check the "Disable Idle Valve" box on the Idle page in K-Pro if your car isn't starting or is running weird. It will normally idle a lot better with it enabled though.
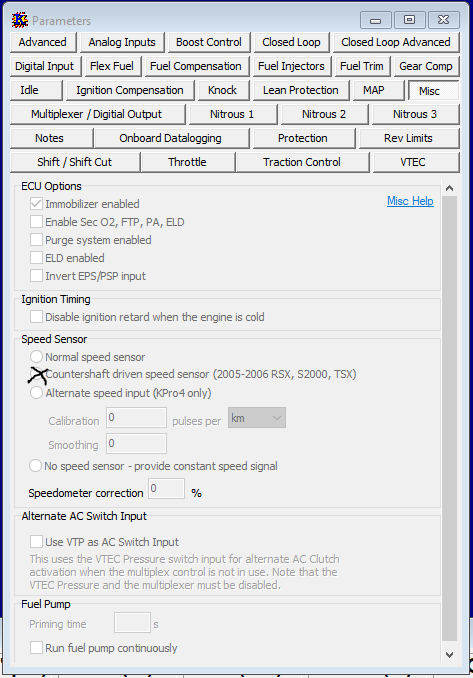
Misc.
 |
| Correct K-Pro ECU Settings Under "Misc" |
Remove the check next to "Immobilizer", "Purge System Enabled", and "ELD Enabled".
Gear Ratios
 |
| This Would Show Gear Ratio Data But The Battery Is Out Of My Car, So I Can't Plug It In And Show That |
Your gear ratios in K-Pro are probably going to be incorrect. Here's the correct values:
- 1st 2.684
- 2nd 1.500
- 3rd 0.984
- 4th 0.733
- 5th 0.571
- Final Drive Ratio: 4.563
Coolant Temperature Sensor
 |
| Coolant Temperature Sensor |
If your car isn't coming up to temperature properly on the dash gauge (halfway), and K-Pro's coolant temperature reading is about 130-140F max, you have a problem. The signal being split between both ECU's doesn't allow proper signal voltage to show either the true coolant temperature. This will cause your radiator fan to never come on, and bad shifting.
- Empty the coolant from the radiator.
- Remove the coolant temperature sensor from the side of the block.
- Spread HondaBond onto the threads of the coolant temperature sensors, and insert and tighten them into the T-fitting. Get it snug with a socket and extension by hand, and then when you can't turn it anymore, give it a 1/4 turn with a ratchet.
- Apply a thin layer of HondaBond to the male T-fitting threads and insert it into the block. Just tighten it until it's snug and give it another 1/4 turn. Do not crank down on it, these threads are tapered and you can break your radiator if you tighten it in too far.
 |
| Engine Coolant Temperature Sensor Location, Driver's Side Of Block |
Wiring it up is pretty easy.
- Cut the signal wiring at the connector back at the ECU, and wire the new coolant temperature sensor directly to it.
- Make sure the old coolant temperature sensor is wired only to the K-Pro ECU.
- Make sure the new coolant temperature sensor is wired only to the base ECU.
VTC Oil Control Valve / Solenoid (DTC P0010)
 |
| VTC Oil Control Valve |
If you get a check engine light and find that it's a P0010 error code, you need to do one of two options:
- Replace the VTC Oil Control Valve / Solenoid with one from a 2002-2004 RSX Type-S.
- Cut the black wire from the VTC Oil Control Valve Plug and extend it from the plug, through the firewall and splice it into K-Pro connector B, pin 23 (VTC-).
I would personally just buy the VTC oil control valve. If you do not fix this, your car will run really badly.
Note: Reportedly, option 2 can introduce some noise in datalogs that seems to be harmless.
 |
| VTC Oil Control Valve Location (Passenger Side Of Engine Block) |
 |
| VTC Oil Control Valve Torque Specs |
Vehicle Speed Sensor (VSS) Issue (Speed Not Displayed On Dash Gauge)
If your dash speedometer gauge doesn't work, but the data readout in K-Pro does, your transmission won't shift properly. This shouldn't happen due to how I chose to wire the harness, by sending VSS to both the K-Pro and Base ECU connector. You can check by jacking the car up and putting it on jackstands, starting the car, and accelerating and watching the gauges so you don't have to leave home. There's a fix for this if it does happen though:
- In K-Pro, check "no speed sensor". You may need to cut K-Pro connector A, pin 18 wire (VSS).
- 2005-2006 RSX's jump VSS OUT pin to K-Pro's VSS pin. Then in K-Pro, uncheck "countershaft driven speed sensor".
 |
| For Solution #1 Only |
 |
| For Solution #2 Only |
Disclaimer:
I may receive payment if you purchase products using my Amazon links. Thanks for helping keep the HID's on : )


 There's 2 female connectors at the end of the wires coming out of the rear of the A, B, and E section of the ECU. As you see in the image above, there's no adaptation for the "C" and "D" sections. Those plugs go directly from the car to the base model ECU.


.PNG)