How To: Install an Oil Pressure Sender / Switch
If you're getting trouble code P1259 or P2647, or leaking oil out of the rear diaphragm of your old oil pressure sender, it's probably time for a new one. It's generally pretty easy to install, but there are some hidden pitfalls that can become a big problem very quickly if you haven't done it before.
Note: If you purchase your supplies from my Amazon links, it will support this website at no extra cost to you. : ) Thank you.
Required Tools
- 24mm Socket
- Ratchet
- OEM Oil Pressure Sender (DO NOT BUY NON-ACURA REPLACEMENTS)
- HondaBond (NO THREAD TAPE)
- Q-Tips
- Isopropyl Alcohol
- Shop Towels
 |
| In VTEC Settings In K-Pro, Make Sure This Box is Empty |
NOTE: If you have K-Pro, you can turn off the oil pressure sender, removing the trouble code and avoiding limp mode. As long as it's not leaking, oil from the sender, I would do this probably and install a separate oil pressure sensor to get a real data readout instead of a MIL that tells you your oil pan is empty way too late. You can see the information above.
 |
| Top: Aftermarket (AutoZone) Bottom: OEM |
NOTE: Before we start, a note on aftermarket oil pressure senders. I've only tried one, but it contributed to cracking my engine block. The electrical connector also falls off incredibly easy, and you can see the difference in taper of them in the picture that causes this. In addition to these problems, the socket size required to remove an aftermarket oil pressure sender is larger than the 24mm required for the OEM sender. This would be okay, but unfortunately it will mean you have to remove one of the oil cooler water lines on the back of the block to fit a socket back there, and you may also need to remove the VVT solenoid. With all these issues, it's really not worth whatever savings you would get from buying an aftermarket sender.
 |
| To Remove the VVT Solenoid, Just Remove the 3 Bolts on the Front |
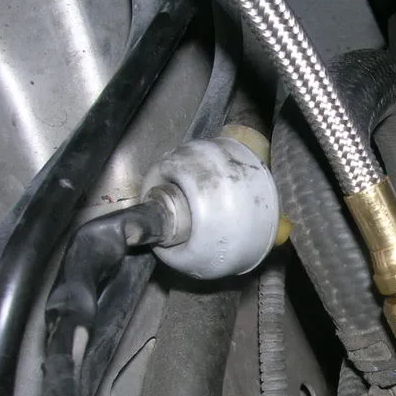
The RSX's oil pressure sender is on the rear of the engine block, above the oil filter and below the variable valve timing solenoid. It can be a little difficult to see without removing the VVT solenoid, but it is possible still.
 |
| Oil Pressure Sender Wire and Boot |
There's a push-on electrical connector on the back that should push off pretty easily. It has a grey rubber boot over it that just slides off.
When you've removed the old sender, wipe the mating surface with a shop towel and some isopropyl alcohol. Then clean the inside of the threads with cotton swabs and isopropyl alcohol until they come back clean. The oil can mess up your torque reading when tightening the sender, and also prevent the HondaBond from curing properly.
 |
| Do Not Use This For This Job |
NOTE: Do not use teflon thread tape here. The threads are tapered, not straight like a normal bolt hole. The taper pushes the thread tape back off the sender to the base of the diaphragm, and it will probably cause a leak. You can see it in the comparison picture of the senders above on the aftermarket one. Stick with HondaBond here.
Apply a thin but complete layer of HondaBond to the threads of the new oil pressure sender, making sure to not get it in the hole on the end of the sender.
 |
| Oil Pressure Sender Location & Torque Spec |
The torque rating for the oil pressure sender is 13 lbf-ft, but I'm not sure if that's taking into account the lubrication of the HondaBond. I personally would tighten the sender by hand with a socket until I can't turn it anymore, and then use a ratchet to turn it another 1/2 turn. Cast aluminum with fine threads is pretty soft, so use an abundance of caution. Keep in mind this is a tapered thread, and if you insert it all the way into the engine block, you WILL crack it.
Reconnect the electrical connection and make sure the rubber boot is pressed on properly
Let the HondaBond dry for 24 hours at least, and then you're all good to drive the car.
Disclaimer:
I may receive payment if you purchase products using my Amazon links. Thanks for helping keep the HID's on : )


